Tag Archives: iPhone

Madness for iPhone 4

After Apple pre-order 600,000 iPhone 4 on the first day, there was a madness to get the iPhone on the 24 June from the Apple store. While writing this I am standing in atleast a half mile queue (including even the people who reserved for it online) in front of Apple Store @ Menlo Park, NJ. I reached here @ 6AM and it’s already being almost 2 hours to wait for my turn.

Will update this blog once have it in hands.

At last after waiting for 4 hours in the queue, I have got my 32GB iPhone4. It’s display is amazing and processing is quite fast with it’s new processor A4 @ 1GHz and with 512MB of RAM.

iOS 4 is really amazing with multi-tasking but all applications does not support this feature. For example, I use HumDesi App to enjoy the Indian music on the way. When I try to put this App in background, it stops playing music. I hope the developers of the application soon will come out with a update to support this feature too.

Mail and Contacts are quite good. And the best part is the new Camera with flash and the front camera to see yourself on the phone. Bit when I tried the FaceTime to have a feeling of the video chat on the phone, it did not work, though we both were on the same Wifi network.

Coming in the construct of the new iPhone, it is indeed very thin from the my previous iPhone 3G. And the glass on the feint and back are really very smooth but sometimes I feel like that it will slip from my hands. So probably I have to go for either the newly introduced bumper or some screen protector to get a good grip.

I will keep updating this blog about my experience of the new iPhone4.
Use iPhone as an USB Drive

USB Drive
USB Drive

Here are the instructions to make your iPhone an USB Drive without installing any software on the computer.

  1. Press to launch Cydia from your iPhone Springboard.
  2. Press to select Manage from the tabs at the bottom.
  3. Press the large Sources button.
  4. Press the Edit button at the top right of the sources list.
  5. Press the Add button that appears at the top left.
  6. Enter http://apt.dmytro.me as the Cydia/APT URL then press the Add Source button.
  7. Cydia will now update your sources. Press the large Return to Cydia button when finished.
  8. Press the Done button at the top right of the sources list.
  9. Press to select the apt.dmytro.me source we just added
  10. Tap to select the USB Drive package from the list of packages
  11. Press the Install button at the top right of the screen.
  12. Press the Confirm button at the top right of the screen
  13. Cydia will now install your package. When it has completed successfully, press the large Return to Cydia button.
  14. Press the Home Button to return to your Springboard then press to launch USB Drive from your list of applications.
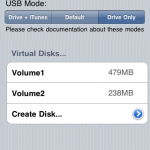
  15. First we must create a Virtual Disk on the iPhone. Press the Create Disk… button to continue.
  16. Enter a name for your virtual disk and use the slider to specify how much space you would like to allocate it. When done click the Create button at the top right of the screen.
  17. Now that we have created a disk to access we must specify the USB Mode. You have three choices:
    Drive + iTunes:
    In this mode USB Drive replaces Picture Transfer Protocol (PTP) interface with Mass Storage interface and lets you use the iPhone as a USB Drive. At the same time you can perform iTunes synchronization, developers can use XCode debugger ,etc. In this mode USB Mass Storage will not work on Windows with iTunes or Apple USB Drivers installed.

    Default:
    This is the iPhone default mode. USB Drive doesn’t install daemon application nor modify any USB settings. Picture Transfer Protocol (PTP) is active as well as iTunes synchronization and tethering over USB.

    Drive Only:
    This mode is to resolve compatibility issues with Windows and iTunes. In this mode USB Drive changes the iPhone’s USB product ID. This will prevent iTunes synchronization, but USB Mass Storage will work on Windows (and other operating systems). Switch to the Default or Drive + iTunes mode will restore iTunes sync.

  18. Press to select the mode of your choice. A popup will appear asking you to reboot to apply the changes. Press the large Reboot button.
  19. Once your iPhone reboots you will now be able to access the virtual disk you created using USB Drive.

You can view the complete tutorial with snapshots at iClarified.

Reblog this post [with Zemanta]